Services
Course Reading
Learning objectives
- Explain a Kubernetes service
- Expose an application
- Discuss the types of services available
- Start a local proxy
- Use the cluster DNS
Overview
Services are the agents connection Pods together or to allow access from outside the cluster. Typically via labels, and refreshed Pods are connected by the service so there is no change in the expected resources at a given Endpoint.
There are multiple types of services, each exposed internally or externally. Services also can be used to connect third party external resources, like a database, for example.
The kube-proxy operator watched the kube-apiserver for new services and endpoints. Random ports are opened listened on for traffic to the ClusterIP:Port and traffic is redirected to the randomly generated endpoint for the service. Services provide automatic load balancing, match label queries. This cannot be configured but there is possibility for session affinity via IP. A headless service (without a fixed IP or load balancing) can be configured.
The unique IP addresses are configured via etcd, so Services implement iptables to route their traffic. Other technologies could be leveraged to provide access to resources later.
Service update pattern
Labels on each Pod are used to determine what traffic should be received from a service. Labels can be dynamically updated on an object which can affect which Pods continue to connect to a service.
By default, the update pattern is to use a rolling deployment. New Pods are added with a new application version, and because of the automatic load balancing they will receive traffic along with the previous version of the application until the old version Pods are terminated.
If there would be an issue where routing traffic to a new and old version of an application during the update would cuase an issue, you may want to take the strategy where you use a more specific label for the new deployment, then turn down the old version, and update the labels to shift traffic to tie back to the original service.
Accessing an application with a service
The basic steps for setting up access to a new service is as follows:
kubectl expose deployment/nginx --port=80 --type=NodePort
kubectl get svc
kubectl get svc nginx -o yaml
You could then hit the nginx server in your browser using the public IP and the port that was exposed with the service (you can find the public IP with a kubectl get pods -o wide or a kubectl get endpoints).
Now let's discuss what we actually did to expose the service, step by step. First we used the kubectl expose command to actually create the service. This service used port 80 and chose a random port to use on the nodes. You can pass a port (which we did) and targetPort. We also specified the type of service with the --type=NodePort option.
Next we ran a kubectl get svc to list all the services and find the one we just created. We see it was created with an internal IP. The range of available cluster IPs and the range of ports that can be used are configurable in the API server startup options.
Finally we ran kubectl get svc nginx -o yaml to view the manifest for the service in YAML format.
Types of services
Behind the scenes, a service is an operator in the kube-controller-manager which sends API calls through the kube-apiserver to the network plugin and kube-proxy Pods running on the nodes. The service operator also creates endpoint operators to query the ephemeral IP addresses of Pods with a specific label. These operators work together to manage the firewall rules of the cluster via iptables or ipvs.
ClusterIP
This is the default service used. It only provides access internally (except when manually creating an external endpoint). The range of ClusterIPs is defined in API server startup options.
The kubectl proxy creates a local service to access a ClusterIP, which is helpful in troubleshooting and development scenarios.
NodePort
NodePorts are useful for debugging or when static IPs are necessary, like for opening a particular address access through a firewall. The NodePort range is defined in the cluster configuration.
Some of these services build upon each other. A ClusterIP service configures a persistent IP and then directs traffic sent to that address to existing Pods ephemeral addresses, but only within the cluster.
When a NodePort service is created, first a ClusterIP is created first. Then a high numbered port is created and a firewall rule is sent out so that traffic to this new port on any node will be sent to the persistent IP, and then the Pods.
LoadBalancer
The LoadBalancer service was created so requests could be passed through cloud providers. Private clouds may also implement this service with a cloud provider plugin like CloudStack or OpenStack. Even without cloud providers, the address is made available for public traffic and packets are spread among Pods in the deployment automatically.
LoadBalancers do not create load balancers. Instead, a NodePort is created and makes async requests to use a load balancer. If a listener sees the request, like would occur when using a cloud provider, one would then be created. If no listener sees the request then the status remains pending since no load balancer responds to the API call.
ExternalName
ExternalName is a newer service. It has no selectors, nor does it define ports or endpoints. It instead allows for an alias to be returned to an external service. This redirect happens at the DNS level, not via proxy or forwarding. This type of service is useful for things not yet brought into the Kubernetes cluster. A simple future change will redirect traffic to the internal objects.
Ingress controllers
Ingress controllers are not services but instead a microservice running within a Pod. They listen on a high port on whichever node the pod is running on, and then sends traffic to service based on the requested URL. Ingress controllers are not built-in, but they are often used with services to centralize traffic. Ingress controllers will be discussed further later.
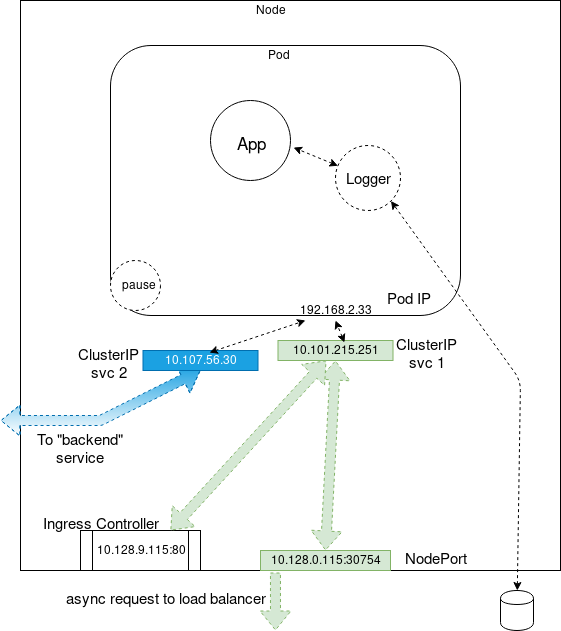
Services diagram
Controllers for services and endpoints run in the kube-controller-manager, and send API calls through the kube-apiserver. The kube-apiserver then talks to the network plugin to direct the agents on each node what to do. Each kube-proxy is also sent an API call to manage the firewall locally, which is typically iptables or ipvs. The kube-proxy mode is configured via a flag, mode, set on initialization. The mode can be iptables, IPVS, or userspace.
In iptables mode, the API continually sends updates to the kube-proxy about changes to Services and Endpoints so rules can be updated as the objects are created, modified, and deleted.
Overall network view
Local proxy for development
When doing local development for an application, a quick way to check the service is to run a local proxy with kubectl. It captures the shell (unless places in the background). When running, calls can be made to the API via localhost and you can also reach the ClusterIP services via the API URLs. The IP and port to listen on is configurable via command arguments. To run a proxy:
kubectl proxy
This starts a proxy on localhost and uses port 8001 by default. Then to access a service, name example, we can use the URL http://localhost8001/api/v1/namespaces/default/services/example. If the service port has a name, you'd append :<port name> to the end of the URL.
DNS
Since v1.13, CoreDNS has been the default DNS provided. CoreDNS allows for a large amount of flexibility. When a container starts, it runs a server for the zones it is configured to serve, then each server loads one or many plugin chains to provide additional functionality. Like other microservices, clients access it using a service, kube-dns.
The in=tree plugins provide most additional common functionality. It is a fairly easy process to write and enable other plugins for extended functionality.
Common plugins are used to provide metrics to Prometheus, for error logging, health checking of the application, among other things.
Verifying DNS registration
To verify DNS setup and check services are being registered, the easiest way is to run a pod with a shell and networking tools, create a service, and then exec in to do DNS lookups.
Troubleshooting DNS in the cluster uses typical tools like nslookup, dig, nc, wireshark, etc. The difference though is we are leveraging a service to access the DNS server, so we need to check labels and selectors in addition to standard network debugging.
Other steps, like checking the Network Policies and firewalls can also be done. These will be covered more in a later chapter.
Lab Exercises
Lab 9.1 - Deploy a new Service
Services are Kubernetes objects which define policies to access logical sets of Pods. They are typically assigned labels so that there is persistent access, even when front or back end containers are terminated and replaced.
Native applications can use the Endpoint API for access but non-native apps can use a virtual IP-based bridge to access the Pods. These use a ServiceType which could be one of the following:
- ClusterIP - default and only exposes a cluster internal IP, so external access is prevented.
- NodePort - exposes a node IP on a static port. A ClusterIP is created in the background.
- LoadBalancer - exposes the service externally on the cloud provider's load balancer. A
NodePortandClusterIPare automatically created. - ExternalName - uses a CNAME record to map the service to the contents of
externalRecord
Services are used to decouple the objects from the traffic so that they can be replaced without any interruption of the client to the backend microservice.
To begin this lab we will first create a YAML manifest for a nginx deployment with 2 replicas.
vim nginx-one.yaml
apiVersion: apps/v1
kind: Deployment
metadata:
  name: nginx-one
  labels:
    system: secondary
  namespace: accounting
spec:
  selector:
    matchLabels:
      system: secondary
  replicas: 2
  template:
    metadata:
      labels:
        system: secondary
    spec:
      containers:
      - image: nginx:1.20.1
        imagePullPolicy: Always
        name: nginx
        ports:
        - containerPort: 8080
          protocol: TCP
      nodeSelector:
        system: secondOne
Before we create anything, first let's look at the nodes and their labels.
kubectl get nodes --show-labels
Now let's get creating our deployment. Notice we want to create the Deployment in the accounting namespace. First we must create it, otherwise we will get an error. Then we can create the deployment.
kubectl create ns accounting
kubectl create -f nginx-one.yaml\
kubectl -n accounting get pods
Now that the deployment is created, when you view the pods you should see that the STATUS is Pending. Now looks the the events when you describe one of the pods.
kubectl -n accounting describe pod nginx-one-<unique ID>
You should see a FailedScheduling warning due to no node matching the node selector we specified in the manifest.
To fix this, let's add the label onto one of the nodes, and then view the labels again.
kubectl label node <worker node name> system=secondOne
kubectl get nodes --show-labels
You should now see a new label, system, on the worker node with a value of secondOne. Now if you check the Pods again, they should have been scheduled and be Running.
kubectl -n accounting get pods
kubectl get pods -l system=secondary --all-namespaces
Now that the Pods are up and running, let's expose the the deployment.
kubectl -n accounting expose deployment nginx-one
kubectl -n accounting get ep nginx-one
You should see some endpoints have been created for the deployment, ending in the port 8080 we specified in the manifest. Try to curl one of the endpoints. And then try to curl the endpoint, but instead using port 80.
curl <endpoint>
curl <IP>:80
The first command should fail with a connection refusal, while the second curl succeeds. This is because nginx listens on port 80 by default. Let's delete the Deployment, change the exposed port to 80, and redeploy.
kubectl -n accounting delete deployment nginx-one
vim nginx-one.yaml
kubectl create -f nginx-one.yaml
Lab 9.2 - Configure a NodePort
Previously we deployed a LoadBalancer. This time we will deploy a NodePort instead using the expose command. NodePorts NAT traffic from outside the cluster. One reason to use a NodePort is to avoid having to use a cloud providers load balancer when deploying one in Kubernetes.
Deploy the NodePort and then describe the services.
kubectl -n accounting expose deployment nginx-one --type=NodePort --name=service-lab
kubectl -n accounting describe services
Find the port number that the NodePort exposed with the service-lab service thst was printed out in the describe. Then find the cluster hostname or IP address. It should be the first line of this command.
kubectl cluster-info
Then you should be able to curl the endpoint made up of the hostname/IP and the NodePort port number. Also try in your browser to reach the NodePort by using the public IP of the node you SSH into and the port number.
Lab 9.3 - Working with CoreDNS
Instead of using IP addresses, we can leverage CoreDNS for predictable hostnames instead. First we will create a Pod for testing using Ubuntu.
vim nettool.yaml
apiVersion: v1
kind: Pod
metadata:
  name: ubuntu
spec:
  containers:
  - name: ubuntu
    image: ubuntu:latest
    command: ["sleep"]
    args: ["infinity"]
kubectl create -f nettool.yaml
Once created, log onto the Pod.
kubectl exec -it ubuntu -- /bin/bash
important
The following commands should all be run on the ubuntu Pod's container. First we will install some tools for investigating the DNS and network.
apt-get update
apt-get install curl dnsutils -y
Then run the dig command. You will see information about root name servers and info about the DNS server responding.
Now take a looks the etc/resolv.conf file. This will show us nameservers and the default domain to search if no Fully Qualified Distinguished Name (FQDN) is used. You'll see the first result is default.svc.cluster.local. Then use the dig command again, this time using the nameserver IP.
cat /etc/resolv.conf
dig @10.96.0.10 -x 10.96.0.10
Notice the domain name, kube-dns.kube-system.svc.cluster.local. and how it uses kube-system.svc.cluster.local. instead of default.svc.cluster.local. from what we saw in /etc/resolv.conf, so that it matches the namespace of the service, kube-dns.
Try to curl the nginx Pod from the previous section, both using the constructed FQDN, and just the service name.
curl service-lab.accounting.svc.cluster.local.
curl service-lab
The first should succeed, and the second command should fail, since the ubuntu Pod we created is un the default namespace, while the nginx deployment is in accounting.
Try again, but appending a .accounting to the end, and the command should succeed, this time. You can then exit the container.
curl service-lab.accounting
exit
Now let's take a look at some of the services in the kube-system namespace.
kubectl -n kube-system get svc
kubectl -n kube-system get svc kube-dns -o yaml
Make note of the selectors used in the kube-dns service. Check the Pods which use this label. Then, look at the configuration of one of the CoreDNS Pods.
kubectl get pods -l k8s-app --all-namespaces
kubectl -n kube-system get pod coredns-<unique ID> -o yaml
Notice there is a mounted ConfigMap. Looks the the ConfigMaps in the kube-system namespace and then view the coredns ConfigMap.
kubectl -n kube-system get configmaps
kubectl -n kube-system get configmaps coredns -o yaml
You should see the cluster.local domain there.
Let's make a simple edit to the ConfigMap, so that test.io redirects to cluster.local by using a rewrite statement.
kubectl -n kube-system edit configmaps coredns
Then add rewrite name regex (.*)\.test\.io {1}.default.svc.cluster.local as the first line under the line starting with .:53.
Once the ConfigMap is edited, delete the coredns Pods so that they recreate looking at the new ConfigMap.
kubectl -n kube-system delete pod coredns-<unique ID 1> coredns-<unique ID 2>
Now create a new web server deployment and a ClusterIP associated with it. Then check the service to get the ClusterIP address and log into the ubuntu container from previous steps.
kubectl create deployment nginx --image=nginx
kubectl expose deployment nginx --type=ClusterIP --port=80
kubectl get svc
kubectl exec -it ubuntu -- /bin/bash
important
Now, in the shell of the ubuntu container, use dig on the ClusterIP of the new nginx service that we retrieved in the last step to do the reverse lookup. Use the address you find in the reverse lookup to do a forward lookup
dig -x <nginx ClusterIP>
dig nginx.default.svc.cluster.local.
Then try the FQDN but using the alias we created using the rewrite command in the ConfigMap.
dig nginx.test.io
exit
You should see the answer section uses the original name, not the requested FQDN.
Now, let's edit the rewrite command in the coredns ConfigMap to add an answer.
kubectl -n kube-system edit configmaps coredns
Change the rewrite line we added before to the following:
rewrite stop {
    name regex (.*)\.test\.io {1}.default.svc.cluster.local
    answer name (.*)\.default\.svc\.cluster\.local {1}.test.io
}
Then delete the pods again as we did before and exec into the ubuntu Pod again.
kubectl -n kube-system delete pod coredns-<unique ID 1> coredns-<unique ID 2>
kubectl exec -it ubuntu -- /bin/bash
important
Once inside the Pod try the dig command again on the FQDN.
dig nginx.test.io
exit
This time, in the answer, we see the FQDN we used as an argument to the dig command is shown.
Now delete the ubuntu Pod.
kubectl delete -f nettools.yaml
Lab 9.4 - Use labels to manage resources
First, try to delete all pods with the system label having a value of secondary. Then view the Pods again.
kubectl delete pods -l system=secondary --all-namespaces
kubectl -n accounting get pods
You should see two new pods running, as the controller responsible for the pods still existed. Get the deployments and show the labels. Then delete the deployment responsible for the pods.
kubectl -n accounting get deploy --show-labels
kubectl -n accounting delete deploy -l system=secondary
Finally, remove the label we added to the node earlier. Note the - after the label name we want to remove, in this case being system.
kubectl label node <node name> system-
Knowledge check
ClusterIP,NodePort,LoadBalancer, andExternalNameare all types of Kubernetes services.- The
kube-proxywatches the API server for configuration changes and iptable updates - A
LoadBalanceris the type of service that spreads packets among pods in a deployment automatically - You can use
kubectl proxyto start a local proxy, helpful for development and testing