Ingress
Course Reading
Learning objectives
- Discuss differences between an Ingress Controller vs a Service
- Learn about nginx and GCE Ingress Controllers
- Deploy and Ingress Controller
- Configure an Ingress Rule
Overview
Earlier we learned about services and how to use them to connect containerized application in Kubernetes to outside the cluster. We can also used Ingress Controllers and Rules to do the same thing.
The difference between a service and ingress controllers lie in the efficiency. Instead of many services, like LoadBalancers, traffic can be routed based on the host or the path. This lets us centralize traffic that could be going to many services to a single point.
Ingress controllers are different from other controllers as they are not managed by the kube-controller-manager. Multiple controller can be deployed with each using unique configuration. A controller will use Ingress Rules to handle any traffic to and from outside the cluster.
There are many options for ingress controllers. Some of them include GKE, nginx, Traefik, Contour, and Envoy. Any tool that can be used as a reverse proxy should be able to work as an ingress controller, these agents will just need to consume rules and listen for the associated traffic. An Ingress Rule is an API object that we can create with kubectl. When the rule is created, it updates the ingress controller to allow traffic to from the outside to the internal service. Services can be left as ClusterIPs and then we can define how traffic gets routed to them via ingress rules.
Ingress controller
An ingress controller is a daemon running in a pod that watches the /ingresses endpoint of the API server. They are part of the networking.k8s.io/v1 group. When new endpoints are created, the daemon uses the configured rules to allow the inbound traffic to the desired service, which is most often over HTTP.
You can deploy multiple ingress controllers. In that case, traffic should use annotations to select the correct controller to use. A lack of matching annotations will cause every controller to try to satisfy the ingress traffic.
nginx
Deploying nginx controllers is made simple through provided YAML files which can be found in the Kubernetes Github
Here you will also find configuration for several different platforms you can run a Kubernetes cluster on.
Like any ingress controller, there is come configuration required to deploy it properly. The deployment can be customized via configMaps, Annotations, or a custom template for more detailed use cases.
- Easy integration with RBAC
- Uses annotation
kubernetes.io/ingress.class: "nginx" - L7 traffic will require
proxy-real-ip-cidrsetting - Bypasses kube-proxy for session affinity
- Does not use
conntrackentries for iptables DNAT - TLS requires host field to be defined
Ingress API resources
A typical Ingress object looks like the this:
apiVersion: networking.k8s.io/v1
kind: Ingress
metadata:
  name: ghost
spec:
  rules:
  - host: ghost.192.168.99.100.nip.io
    http:
      paths:
      - backend:
          service:
            name: ghost
            port:
              number: 2368
        path: /
        pathType: ImplementationSpecific
Like all object, you can manage Ingress objects with kubectl.
ubuntu@cp:~ $ kubectl get ingress
ubuntu@cp:~ $ kubectl delete ingress <ingress name>
ubuntu@cp:~ $ kubectl edit ingress <ingress name>
Deploying the ingress controller
Deploying an ingress controller is as simple as running a kubectl apply command. You can find the source for a sample ingress from the link in the nginx section. You could also install the ingress controller via Helm by following the sample's guide.
You can check all that was deployed with the sample by running kubectl get pods,rc,svc to see what was deployed.
Creating an ingress rule
Creating an ingress rule is fairly simple. First let's assume we have a running pod and service.
ubuntu@cp:~ $ kubectl run ghost --image=ghost
ubuntu@cp:~ $ kubectl expose deployments ghost --port=2368
Now you could apply the ingress rules we defined with the example in Ingress API resourcessection. Once the ingress is created, the you should be able to access the application external to the cluster.
Multiple ingress rules
If you have multiple services, you could also define multiple rules in the ingress definition. To do this you would just add to the list defined under the rules section of the manifest.
Intelligent connected proxies
If you want to do things like service discovery, rate limiting, traffic management, or advanced metrics, you will likely need to implement a service mesh. A service mesh consists of edge and embedded proxies that talk to each another to handle traffic based on rules from a control plane.
There are many options for service meshes, with some of the most popular being Envoy, Istio, and linkerd.
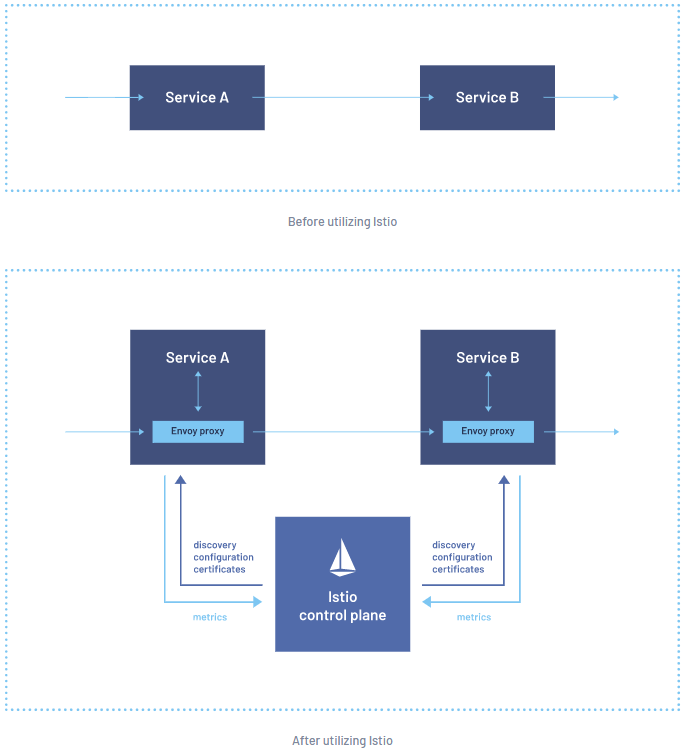 |
|---|
| Example of a service mesh from Istio |
- Envoy - a modular and extensible proxy. It is popular due to the open construction, modularity, and it's dedication to remain unmonetized. It is common to use Envoy for as a data plane under near other tools in a service mesh.
- Istio - a set of tools that leverages Envoy's proxies to construct a multi-component control plane. It is intended to be platform independent.
- linkerd - service mesh built for ease and speed of deployment and for being ultralight.
Lab Exercises
Lab 11.1 - Service mesh
First we will install linkerd. Make sure all the installation steps are successful by reviewing the output of each command.
ubuntu@cp:~ $ curl -sL run.linkerd.io/install | sh
ubuntu@cp:~ $ export PATH=$PATH:/home/ubuntu/.linkerd2/bin
ubuntu@cp:~ $ echo "export PATH=$PATH:/home/ubuntu/.linkerd2/bin" >> $HOME/.bashrc
ubuntu@cp:~ $ linkerd check --pre
ubuntu@cp:~ $ linkerd install --crds | kubectl apply -f -
ubuntu@cp:~ $ linkerd install --set proxyInit.runAsRoot=true | kubectl apply -f -
ubuntu@cp:~ $ linkerd check
ubuntu@cp:~ $ linkerd viz install | kubectl apply -f -
ubuntu@cp:~ $ linkerd viz check
ubuntu@cp:~ $ linkerd viz dashboard &
The GUI for linkerd is enabled on localhost by default. We need to edit the web deployment and service to allow for access of the GUI outside the cluster since we are running in a cloud provider.
For the deployment, in the container args, find the enforce-host line and remove the value after the =.
On the service, add the nodePort to the http port with some high valued port number that is easy to remember and set the service type to a NodePort.
ubuntu@cp:~ $ kubectl -n linkerd-viz edit deploy web
ubuntu@cp:~ $ kubectl -n linkerd-viz edit svc web
Test access to your public IP.
ubuntu@cp:~ $ curl ifconfig.io
Now use the public IP and the NodePort number you set to access the GUI in a browser on your local machine.
With the GUI accessible externally we can now add the annotations we need for linkerd to watch those objects. linkerd can do this for us by piping kubectl commands to linkerd and then back to kubectl. You should see an error about the creation of the object but it should work fine. The view the GUI again and you should see the accounting namespaces are meshed.
However, let's first create a deployment and expose it with a service to use in the service mesh.
ubuntu@cp:~ $ kubectl -n accounting create deploy nginx --image=nginx
ubuntu@cp:~ $ kubectl -n accounting expose deployment nginx --type=ClusterIP --port=80
Then we will inject the annotations.
ubuntu@cp:~ $ kubectl -n accounting get deploy nginx -o yaml | linkerd inject - | kubectl apply -f -
Then we will want to generate some traffic to pods and watch that traffic in the UI. We'll use the nginx service we just created.
ubuntu@cp:~ $ kubectl -n accounting get svc
ubuntu@cp:~ $ curl <nginx ClusterIP>
In the UI you should see some HTTP metrics in the accounting namespace. Now let's scale up the nginx deployment to 5 replicas and then generate traffic to them.
ubuntu@cp:~ $ kubectl -n accounting scale deploy nginx --replicas=5
ubuntu@cp:~ $ curl <nginx ClusterIP>
ubuntu@cp:~ $ curl <nginx ClusterIP>
ubuntu@cp:~ $ curl <nginx ClusterIP>
ubuntu@cp:~ $ curl <nginx ClusterIP>
ubuntu@cp:~ $ curl <nginx ClusterIP>
ubuntu@cp:~ $ curl <nginx ClusterIP>
In the UI we should see 5 replicas being meshed in the namespace as well as some other statistics.
Lab 11.2 - Ingress controller
Now we will use Helm to install an ingress controller.
First, we will want to create two deployments, one called web-one running httpd, and another called web-two running nginx.
ubuntu@cp:~ $ kubectl create deployment web-one --image=httpd
ubuntu@cp:~ $ kubectl create deployment web-two --image=nginx
ubuntu@cp:~ $ kubectl expose deployment web-one --type=ClusterIP --port=80
ubuntu@cp:~ $ kubectl expose deployment web-two --type=ClusterIP --port=80
Linkerd does not have a bundled ingress controller so we need to install on the cluster ourselves to manage traffic. We will use a Helm chart to do this. Let's search for ingress with Helm and then install the popular nginx ingress controller.
ubuntu@cp:~ $ helm search hub ingress
ubuntu@cp:~ $ helm repo add ingress-nginx http://kubernetes.github.io/ingress-nginx
ubuntu@cp:~ $ helm repo update
Now we will download the chart, and update the values.yaml so that the ingress controller uses a DaemonSet instead of a Deployment by changing the kind field.
ubuntu@cp:~ $ helm fetch ingress-nginx/ingress-nginx --untar
ubuntu@cp:~ $ cd ingress-nginx
ubuntu@cp:~/ingress-nginx $ vim values.yaml
Then, we will install the controller. Then watch for the service to come up. When getting the ingress, you should see no resource available yet. We will create that later.
ubuntu@cp:~/ingress-nginx $ helm install myingress .
ubuntu@cp:~/ingress-nginx $ cd ..
ubuntu@cp:~ $ kubectl get ingress --all-namespaces
ubuntu@cp:~ $ kubectl get services -o wide myingress-ingress-nginx-controller
ubuntu@cp:~ $ kubectl get pod --all-namespaces | grep nginx
Once the ingress controller is up and running, we can set up the ingress rules.
ubuntu@cp:~ $ vim ingress.yaml
apiVersion: networking.k8s.io/v1
kind: Ingress
metadata:
  name: ingress-test
  annotations:
    kubernetes.io/ingress.class: nginx
  namespace: default
spec:
  rules:
  - host: www.external.com
    http:
      paths:
      - backend:
          service:
            name: web-one
            port:
              number: 80
        path: /
        pathType: ImplementationSpecific
status:
  loadBalancer: {}
And now with the ingress rule defined, we can create it and verify it is working.
ubuntu@cp:~ $ kubectl create -f ingress.yaml
ubuntu@cp:~ $ kubectl get ingress
ubuntu@cp:~ $ kubectl get pod -o wide | grep myingress
ubuntu@cp:~ $ curl <Pod IP>
At this point you should see you got a 404 error response from your curl. Now let's check the LoadBalancer service (don't use the admission controller that you will see).
ubuntu@cp:~ $ kubectl get svc | grep ingress
ubuntu@cp:~ $ curl <myingress-ingress-nginx-controller service IP>
Again you should see that you are getting a 404 error. Let's try it again, this time passing a header matching the URL to one of the services we created earlier. If it works you should see a default nginx/httpd server page.
ubuntu@cp:~ $ curl -H "Host: www.external.com" http://<myingress-ingress-nginx-controller service IP>
With that working we can then add the annotations for linkerd. Again, you will see some warnings but it should work.
ubuntu@cp:~ $ kubectl get ds myingress-ingress-nginx-controller -o yaml | linkerd inject --ingress - | kubectl apply -f -
Now let's update the ingress with a new rule. Edit the ingressand all the following tospec.rules` field.
ubuntu@cp:~ $ kubectl edit ingress ingress-test
  - host: internal.org
    http:
      paths:
      - backend:
          service:
            name: web-one
            port:
              number: 80
        path: /
        pathType: ImplementationSpec
Now test the ingress rule by curling with the new header.
ubuntu@cp:~ $ curl -H "Host: internal.org" http://<myingress-ingress-nginx-controller service IP>
You should see the nginx default page.
Knowledge check
- According to the documentation, Kubernetes currently support 3 ingress controllers (AWS, GCE, and nginx)
- The main reason to use an ingress controller is for efficiency
- Both L4 and l& traffic can be configured